December is the 6th month of Creative Outpour! We have really enjoyed sharing our creativity & inspiration with you. Here is a highlight from each month so far:

Wednesday, December 29, 2010


Tuesday, December 28, 2010
A Quilt for Baby boy Presley!!!
Lately it has been Brrrrrrr cold in sunny south Florida. With night time temps in the 20's all I can think about is warm blankets! And as most of you know, my sister Jackie is having a baby boy!!! Which means......quilt time!! I'm getting pretty excited about different patterns and fabrics I could use for a modern yet cutesy BOYS quilt. No pinks or purples...but instead bold oranges and greens and reds and black!!! So-I'm sharing a few ideas I came across today. I hope to start the quilt in the next month. My first quilt for Miss Katiepie took me 9 months!! Beginner quilter here. :) Hopefully this one will be done before he is 3 months old. I will keep ya'll posted!
 "2d Zoo" by Alexander Henry
 "Robots" by Michael Miller
 "Zoology" by Michael Miller
 "Boys Retro" at www.etsy.com/shop/poppyseedfabrics
 "Bulls eye" by Riley Blake
 "Dino Dudes" by Michael Miller
 "2d Zoo" by Alexander Henry
 "Robots" by Michael Miller
 "Zoology" by Michael Miller

 "Boys Retro" at www.etsy.com/shop/poppyseedfabrics
 "Bulls eye" by Riley Blake
 "Dino Dudes" by Michael Miller


Wednesday, December 22, 2010
A New Contributor & Her Holiday Decor Project!
Welcome Kanya!


Kanya just joined Creative Outpour as our newest contributor. She is one of my besties and quite the creative chica! She sews, paints & jazzes up furniture. So excited to see share her with you and to see what all she will bring!
So, without further ado, I present her first project submission. She got a set of Christmas plates & really wanted to hang them on the wall, but then she got the idea to take things a step further:


She continued the design onto a canvas behind the plate! They turned out so cute.

Such a fun, whimsy idea to decorate for Christmas!
Thanks for sharing Kanya & we look forward to all your jazzy posts in the future!!
Monday, December 20, 2010
"Green" Christmas gift tags (EASY!)
Everyone likes to talk "Green" and recycling these days and in the spirit of reusing (and having a tiny Christmas budget) I came up with this idea.
What you will need:
Spray adhesive, old Christmas tissue (I like the cute decorative kind. I smooth it out with my hands before use) or wrapping paper, old cardboard gift boxes, scissors, hole puncher, silver sharpie, other colored markers, black pen
1. To start, spray the adhesive on the white side of the cardboard gift boxes. I usually have several Kohl's or Macy's boxes waiting to be re-used. Lay the tissue paper (recommended) or wrapping paper on the sticky side and let dry.
2. Once dry, cut up the box into the size of tags you are wanting.

3. With the black pen, sketch out the shape of a wreath, a bell, a stocking, etc. It doesn't have to be perfect! (see below pics. click to enlarge) I wrote Merry Christmas in a scripty way then darkened it in a little. With the markers, fill in some color, but not too much. With the silver sharpie, make little embellishments!


4. With the hole punch, make a hole, being careful not to do it too close to the edge or it won't tie on properly to a ribbon. I have made that particular mistake on a fairly regular basis!
5. Attach them to gifts and prepare to be surprised at how much people notice and comment on them!!! :)

Tuesday, December 7, 2010
Coffee Filter Wreaths
If you read my previous post on my fire place, you got a sneak peak at my project. While drooling over someone else's house on their blog, I noticed a beautiful wreath hanging above her mantle. She didn't directly talk about making it but when I continued to read she mentioned she used coffee filters extensively so I put two and two together. I did a little research and found several different suggestions for making a coffee filter wreath but through some trial and error (and lots of hair pulling) I found the quickest and easiest way to do it. :) Still, this may take a little time so wait until the kiddos are in bed and put on It's A Wonderful Life or some other Christmas movie that makes the heart happy.
(click on any of the pictures to see greater detail)

Step 1: Get the supplies. A foam wreath, floral wire, wire cutters, glitter, *chipboard or wooden letters and ribbon are all things easily found at most craft stores like Hobby Lobby, Michael's or JoAnn's. I already had 100-200 coffee filters, but Wal-Mart has them in supply and also has a cool brown filter color option for the chocolate color lovers.
*preferred method
Step 2: Grab a coffee filter and twist it at the bottom creating a little flower. (see above pic)
Step 3: Clip a wire section off and twist it around the bottom of 2 of the coffee filter flowers.
Step 4: At this point I would highly recommend using a craft glue or hot glue gun and put a little dab on the end before you stick the other end of the wire firmly into the foam wreath. I didn't use glue and the filter twists kept falling out. (Grumble Grumble)
Step 5: Repeat steps 2-4, putting the flowers close together. (see above pic)
**********

Step 6: In a pie pan, smear glue all over the first letter then sprinkle liberally with glitter. Repeat with remaining letters. Let dry.
Step 7: Fill any bare spots on the wreath while waiting.

Step 8: If you used wooden letters- using ribbon, make little knots around the letters and while the wreath is hanging, experiment with where you want them to hang before securing the ribbon to the wreath. I tied mine around the wreath itself very careful not to knock off the filter flowers. Hot glue would work here as well. This part was frustrating for me, but I do love the finished product!
If you used chipboard letters, I'd just place some hot glue on the back of them and stick directly to the coffee filter flowers. They are extremely light-weight and will stick. You don't need ribbon unless you just want to embellish a little.
Step 9: With a hot glue gun or craft glue, adhere ribbon at the length you want it to hang. With another ribbon, tie a big bow. Hang wreath up, then add the bow and fluff!
Of Ugly Fireplaces and Shoes Galore (Design Challenge!!!)
I'm the first person to chime in with design ideas when I visit a friend's house... with or without invitation! :) But sometimes for my own house I just hit a wall mentally and can't seem to get stuff done. Anyhoo this post is in 2 parts today:
1. For real ya'll my fire place is ugly. It's the late 70's early 80's of using slightly pink/mauve colored bricks outside and in a house. I've been trying to decide what color and when to paint it. (Trying to convince my husband has also proved to be a challenge!) Jacqueline sent me a picture of a fireplace that she said reminded me of mine and I was intoxicated with copying the picture for my own place-
Here:
I think that mine will look great once it's finished. Our neighbor does wood working and we think we'll hire him to make a custom wrap around mantle on three sides. It will be simple and probably shorter on the sides so people don't bang their heads on it. My husband already bangs his head on the one we have. I also need something to put on either side of the actual fire place. OH and we are soooo going to either paint or get a new fireplace door!! My fireplace looks like this:

**You got a little preview in that picture of something that will be a fun craft post to follow in a few days!!
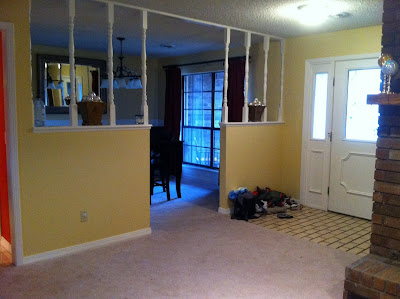
2. So the second part is a design challenge! I need some HELP PLEASE! I have this floor area when you walk in my door that is the catch all for all our shoes, hats, coats, back packs and JUNK. I need to have an organized area that can hold it all. On top of that I would like to have a pretty entry way, like with a table and something that just POPS when you walk in. I don't know how to accomplish this. I need some input from you other designers and wanna-be's like me! :) Please, PRETTY PLEASE leave some helpful comments or just e-mail us and I'll do another post with your ideas!
1. For real ya'll my fire place is ugly. It's the late 70's early 80's of using slightly pink/mauve colored bricks outside and in a house. I've been trying to decide what color and when to paint it. (Trying to convince my husband has also proved to be a challenge!) Jacqueline sent me a picture of a fireplace that she said reminded me of mine and I was intoxicated with copying the picture for my own place-
Here:
 |
| Cottage Instincts |
I think that mine will look great once it's finished. Our neighbor does wood working and we think we'll hire him to make a custom wrap around mantle on three sides. It will be simple and probably shorter on the sides so people don't bang their heads on it. My husband already bangs his head on the one we have. I also need something to put on either side of the actual fire place. OH and we are soooo going to either paint or get a new fireplace door!! My fireplace looks like this:

**You got a little preview in that picture of something that will be a fun craft post to follow in a few days!!
2. So the second part is a design challenge! I need some HELP PLEASE! I have this floor area when you walk in my door that is the catch all for all our shoes, hats, coats, back packs and JUNK. I need to have an organized area that can hold it all. On top of that I would like to have a pretty entry way, like with a table and something that just POPS when you walk in. I don't know how to accomplish this. I need some input from you other designers and wanna-be's like me! :) Please, PRETTY PLEASE leave some helpful comments or just e-mail us and I'll do another post with your ideas!

1 comment
:
Labels:
before and after
,
Christmas mantle
,
Design Challenge
,
entryway help
,
fireplace
,
fireplace redo
,
painted brick


Saturday, December 4, 2010
DIY Book Page Wreath by Brian Carreno
Have you seen those wreaths made from book pages?

A guy who works with my husband is quite crafty and made one. He was kind enough to share the lovely details with us. See below:
---
Supplies:
1) Hot glue gun
2) Styrofoam wreath/wheel
3) Craft paint (color depends on what feel you’re going for. I choose red and silver for Christmas, but you can go with grey/brown for an aged look)
4) Book(s) (Number of books depends on how thick the book is. I purchased mine at Dollar Tree for $1. No fear; they weren’t literary classics.)
---
1. The wreath would look just as awesome and spectacular being plain book pages; however, to add a subtle hint of color, take the craft paint and paint the edges of the book. Depending on how subtle you want the color, you can either leave the paint the consistency it is, or water it down some so it seeps into the pages a bit more. I did duo colors of red and silver, so I let one color dry before applying a bit of the other. Instead of letting the book air dry out (and because I’m VERY impatient), I took ahair dryer to the book and dried out the pages.
2. Now we’re ready to start with the Styrofoam wreath/wheel. I bought mine at the craft store. I opted for one that was already tubular, but there were some that were rectangular (and cheaper) that could be worked with or shaven with a serrated knife to get the right shape. Flip the wreath to whichever side you want to be the back. Tear or cut out a page of the book and, with the colors side out, fold it in a way that creates waves/loops/curls in the page. The main thing to keep in mind is that you do not want VISIBLE hard creases/folds; you want everything that’s visible to be waves and ruffles. I only creased about the bottom inch of the page, added hot glue between the creases so it’d keep its shape, and then added hot glue to one side of the bottom inch before applying it to the back of the Styrofoam wreath. You want to create a “halo” of waved/curled/looped pages poking out of the back of the wreath. Before continuing, I wanted to clarify that there are endless ways to curl the paper, but you can take 2-3 pages to create stiffer curls/waves/loops or to create interesting layered curls/waves/loops.
3. Turn the wreath over so you’re looking at the front. On a flat surface (like a table), gently press down on the Styrofoam while making a gentle twisting motion. This will gently flatten any part of the glued pages directly under the Styrofoam and make the rest of the page bend towards the front without creating visible hard creases in the pages. This will make it easier to attach flush to a wall/door.
4. Now take more pages and create more curls/waves/loops. There is a difference in the application of the pages this time. After putting glue between the creases in the bottom inch like before, completely fold that bottom inch up and crease; this will create an L shape tab to the page. Apply hot glue to one side of the tab and apply to the Styrofoam. The tab will allow a part of the page to be flush with the Styrofoam so it holds securely, but it will allow the rest of the page to shoot out away from the Styrofoam.
5. Work around the wreath in layers by doing step 4 repeatedly. This will insure you get even coverage.
6. Now that you’ve covered the wreath, it’s time to create fullness and depth to the wreath. Taking pages and curling them the way you want, apply drops of hot glue to parts of the pages that allow the page to keep its shape. It’s not necessary to crease the bottom inch on these pages; however, if see spots where you don’t want the torn edge of the page to be seen, it might be good to crease and glue the bottom inch to create a visual “dead end” to the loop. You don’t create tabs on these pages because it is not necessary that these pages touch the wreath base. Applying light hot glue to the outside parts of the wave/loop/curl, gently push the page into gaps you feel need filling. The page will secure itself with the hot glue to the other pages. Working around the wreath, you slowly start to create more fullness to the wreath. Create depth by pushing the pages in at different lengths.
7. Once you’re done with your wreath, turn it over and hot glue a small loop of ribbon to the base. This will be the loop on which you hang it on. Ta-da! Your non-traditional wreath is complete.


Big thanks to Brian for sharing his project with us!
Do you have a wreath project you'd like to share?
Subscribe to:
Posts
(
Atom
)